
Transporting your cake is possibly the most anxiety-inducing stage of every baker’s journey. While you can’t control everything, here are the tips I swear by to help keep a cake intact during its maiden voyage out into the big bad world.
Hold the whipped cream
Firstly, avoid soft fillings. Buttercream works fantastically as the stiff layers hold your cake together. However, a soft, loose filling such as whipped cream may not be the best idea. If a component of the filling is soft, such as a fruit compote, caramel, curd or jam, be sure to put a border of buttercream around the edge of each layer before loading the centre with the soft filling. This will hold the cake layers up and also keep the filling from sliding around too much. Think of it as a fence or dam to hold in your filling. (See below for the “dam” method to filling a cake, plus my recipes for a Swiss meringue buttercream, and a raspberry compote filling.)
If the weather is hot, keep the cake in the refrigerator right up until you need to leave, then blast the air conditioner in the car and be sure to dress warmly – you want the car to feel like the inside of a refrigerator. If your journey is longer than four hours, consider using a filling that doesn’t require refrigeration.
Decorate at your destination
I generally choose a decorating method that is conducive to travel, such as stiff buttercream ruffles or smaller decorations such as wafer flowers or sprinkles which can be easily held in place. If you’re using fragile or larger decorations such as fresh flowers, meringues or chocolate, it’s best to add these after you have arrived at your destination. Not only will it make travelling less stressful, it will ensure your cake looks perfect when served.
Get support in all the right places
If you’re planning to transport a tiered cake, using internal cake supports is essential. There are different kinds of dowels that can be used to support a cake, such as hollow plastic dowels, sturdy plastic straws and even wooden skewers. Whatever you choose, it needs to be food-safe.
My personal preference is to use wooden cake dowels. They can be found in cake decorating stores and are sturdy yet inexpensive. The tiered cake sizes I usually make are 23cm (9 inches), 18cm (7 inches) and 13cm (5 inches). Of course, you can use different sizes according to your requirements – and how much you are physically able to lift.
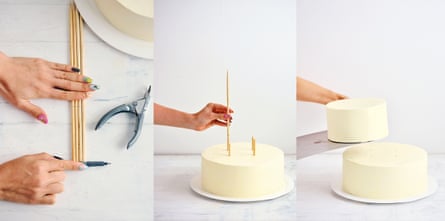
Stacking a tiered cake
1. Mark the height of four dowels and trim using clippers, small branch pruners or dowel cutters.
2. Insert the trimmed dowels into the cake, well inside where the next cake tier will sit. Use a spare cake dowel or an offcut to push them right down into the cake.
3. Add cake dowels to the second cake tier (if your cake has more than two tiers), then carefully lift the second tier (including the cardboard cake board) on top of the first tier using a metal spatula or a cake lifter.
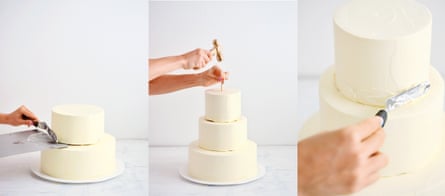
4. Use a large offset spatula to help gently slide the second cake tier off the cake lifter and into position in the centre of the first cake tier.
5. To make sure the tiers won’t slide off, sharpen one end of a long wooden dowel with a clean pencil sharpener – make the dowel slightly shorter than the cake. Then drive the dowel down through all the cake layers.
6. Mask the hole created on top of the cake – as well as any other gaps or blemishes between the tiers – with an offset spatula and a little leftover frosting. Finish decorating the cake as desired.
And remember to pick out the dowels after cutting, or let your cake receiver know there are dowels in the cake.
Box it in
If you are transporting a smaller cake over long distances, get a sturdy box to put the cake in (or invest in a professional cake carrier). The board or plate the cake is on should be touching the sides of the box so that it doesn’t slide around. Rather than lower the cake inside the box, I use a box cutter to open up one side of the box so the cake can easily slide in and out. Use packing tape to close the box before travelling.
Get a grip
When you place a cake in the back of a car (I usually place mine in the clean boot), whether in a box or just stacked on a cake board, you want to make sure it doesn’t move around as you drive. The easiest way to do this is to place the cake or box on top of a nonslip mat.
The best option is a silicone baking mat that is larger than your cake. Put the mat down first and then place the cake on top of it. If you don’t have a silicone baking mat, use a silicone pot holder, a yoga mat or even a rubber cabinet liner. Anything that will help grip the cake (rubber, silicone, plastic) will work. And of course, no sudden braking!
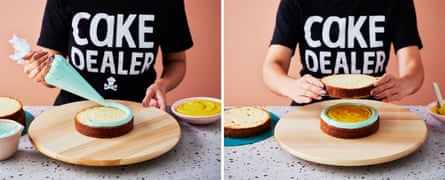
Filling the cake: the ‘dam’ method
With a piping bag, pipe a ring of buttercream around the edge of the cake layer. This acts as a wall to prevent your filling from escaping. Fill the buttercream “dam” with the filling of your choice, then add the next layer of cake and continue filling and layering.
Raspberry compote filling
4 cups fresh or frozen raspberries (500g)
¾ cup white sugar (165g)
1 tbsp lemon juice
2 tsp lemon zest, finely grated
¼ cup cornflour (30g)
Place raspberries, sugar, lemon juice, lemon zest and a quarter of a cup of water in a saucepan and heat over medium–high heat. Stir the mixture until it begins to boil.
Lower the heat to medium–low and allow the filling to simmer for 10 to 15 minutes, stirring occasionally.
Turn the heat off and remove the saucepan from the heat. If you want a seed-free compote, pour the mixture through a metal sieve suspended over a bowl and push through using a silicone spatula. Use a decent amount of pressure to really get all the liquid through the sieve. You should be left with about half a cup of seedy pulp which you can compost, or add a dollop to your morning granola. Or feel free to leave the seeds in if you prefer.
In a separate small bowl, make a slurry by combining a quarter of a cup of water with the cornflour. Stir until the cornflour has fully dissolved into the water. Stir this cornflour mixture into the strained raspberry compote until it is incorporated.
Return the compote to the saucepan and heat on medium–high heat – be sure to stir constantly during this stage to prevent it from burning. Cook until the mixture begins to boil, then reduce the heat to medium–low.
Continue to stir and cook for a few additional minutes. Turn the heat off and pour the compote into a bowl to cool, then cover with plastic wrap and place in the refrigerator for at least one hour, or preferably overnight.
Perfect Swiss meringue buttercream
Through years of making and eating countless variations of frostings, cream cheeses and buttercreams, I’ve found meringue-based buttercreams create the smoothest finish. I enjoy making Swiss meringue buttercream in my kitchen – it is silky smooth and fluffy, extremely stable for stacking multiple cake layers, and tastes simply divine.
Makes 10 cups (2.5 litres)

2½ cups caster sugar (550g)
10 large egg whites (pasteurised egg whites are available in cartons at most major supermarkets), chilled
900g unsalted butter, softened to a spreadable consistency
2 tsp vanilla bean paste
Place the sugar and egg whites in a heatproof glass bowl. Set the bowl over a saucepan of gently simmering water and whisk until the sugar has dissolved and the egg whites are slightly warm to the touch (at least 40C). (You can omit this step entirely if you are using pasteurised egg whites, and instead, simply place the sugar and egg whites directly into the mixer.)
Transfer the mixture into the bowl of a stand mixer fitted with the whisk attachment. Whisk on high speed until the mixture has formed stiff and glossy peaks, around 10 to 15 minutes.
Switch to the paddle attachment. Add the butter in thirds and beat on high speed after each addition until incorporated. Don’t be alarmed if the buttercream appears curdled – it will become light and fluffy again with continued beating for around two to three minutes (I absolutely promise!). Add the vanilla bean paste and beat until just combined.
The buttercream is now ready to be used. If you are making buttercream ahead of time and you find there are bubbles visible when you come to use it, you may need to mix it further before use. Using a stand mixer fitted with the paddle attachment, beat on low speed for two to three minutes to eliminate the air bubbles.

Storage: Cover the bowl with plastic wrap and set aside in a cool, dry place until needed. You can refrigerate this buttercream for up to 10 days or freeze for up to two months. Thaw frozen buttercream overnight in the refrigerator, then bring to room temperature (gently reheat in the microwave in 20-second bursts if needed). Beat the buttercream on low speed until smooth before applying to your cake.
-
This is an edited extract from Bake My Day by Katherine Sabbath, photography by Jeremy Simons, available now from Murdoch Books ($45)