
A few years ago, my youngest daughter Lucia and I were diagnosed with coeliac disease (mine not full-blown, only latent). We now eat a strict gluten-free diet, as this is the only treatment for coeliac disease.
On receiving Lucia’s diagnosis, I wanted to ensure that she still had access to healthy and delicious food: good bread and pastries, the occasional sweet treat. This was, in part, due to my background as a trained nutritionist, but also a result of my upbringing.
Growing up in New Zealand with Tongan and Dutch parents, all my early happy memories revolve around food: the eating, for sure, but also the preparation. From baking banana bread to use up bananas that were going black, to making coconut milk from scratch or preparing dinner for the many aunties, uncles and cousins who inevitably turned up every night at my grandparents’ house expecting to be fed. Cooking in our house was a way to share love, and I wanted to make sure Lucia didn’t miss out.
So I began to dip my toes into the world of gluten-free baking – which should come as little surprise, I suppose, as baking runs in the family. My grandfather was a baker and wooed my grandmother with fresh loaves of bread.
But the gluten-free recipes I could find were pretty hit and miss, so I experimented until I was happy.
If my daughter and I were facing this challenge, I thought surely others were too, so I opened the Wholegreen Bakery in Sydney.
In the years since, it has been such a joy to see the business grow and to help return the pleasure of eating to so many people. It’s an extremely humbling and rewarding experience to give someone back the food they love to eat.
Lemon and coconut cake with lemon glaze
(Pictured above)
Grain- and dairy-free, light, soft and moist – this is one of the most popular lemon cakes we have ever made in the bakery.
Serves 8
80g coconut flour (⅔ cup)
100g almond meal (1 cup)
1 tsp baking powder
1 tsp ground cinnamon
6 eggs, at room temperature
295g caster sugar
330ml sunflower oil (1⅓ cups)
1 tsp vanilla paste
Zest and juice of 2 lemons, plus juice of 1 extra lemon for brushing
Toasted coconut flakes, to decorate
For the lemon glaze
250g gluten-free icing sugar, sifted (2 cups)
60ml lemon juice (¼ cup)
Finely grated zest of 1 lemon, plus extra strands of zest to decorate
Preheat the oven to 170C/150C fan with the oven rack positioned in the middle of the oven. Grease a 20cm round spring-form cake tin and line the base and sides with baking paper.
Sift the coconut flour, almond meal, baking powder and cinnamon into a bowl and whisk together thoroughly. (Don’t be tempted to skip this step – the coconut flour in particular needs sifting as it has a tendency to be lumpy and tricky to break down during the mixing process.)
Using a stand mixer with the whisk attachment, or in a large bowl with a hand mixer, whisk the eggs and sugar together on high speed until pale and fluffy. Slowly add the oil and vanilla and continue to whisk for 30 seconds more.
Using the paddle attachment on low speed, add the sifted dry ingredients and fold in until everything is mixed together thoroughly. Then add the zest and juice of two lemons and mix well. Pour the batter into the prepared tin and smooth the top with the back of a spoon.
Bake for 1 hour and 15 minutes, rotating halfway through for even cooking, until the cake is dark golden, a skewer inserted into the centre of the loaf comes out clean, or the cake springs back when you press down gently on the top with two fingers. (If the cake is looking a little dark on top towards the end of the cooking time, don’t worry – that’s how it should look. It won’t be burnt.)
Remove the cake from the oven and brush the top with lemon juice. Leave to cool completely in the tin before releasing the spring, removing the sides and peeling away any baking paper as necessary. Remove the cake tin base by sliding the cake on to a serving plate.
For the lemon glaze, combine the icing sugar, lemon juice and lemon zest together in a bowl until smooth.
Pour the glaze over the top of the cake, then use a flat-bladed spatula to quickly smooth so it gently spills over the sides to create a drip effect. Decorate with toasted coconut flakes and a little lemon zest. If you want the icing to set (which makes it easier to slice), place the cake in the fridge for 10 minutes before slicing.
Storage: This cake will stay fresh in an airtight container in the fridge for up to five days. It also freezes beautifully – simply wrap the (un-iced) cake in plastic wrap and freeze for up to one month. When ready to eat, remove from the freezer and glaze and slice your cake while still frozen for perfect slices. Allow 20 minutes to defrost after cutting before serving.
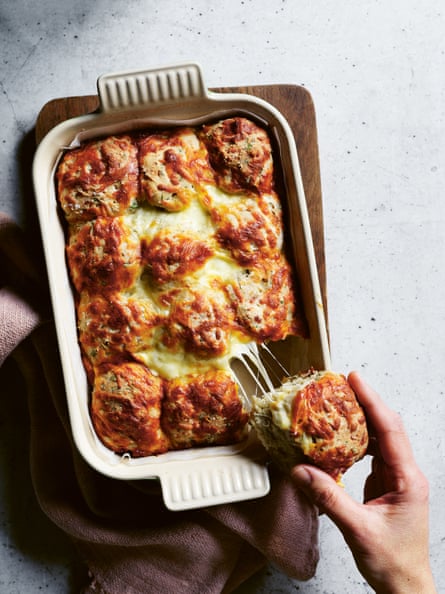
Cheesy garlic pull-apart buns
Serve these hot while the cheese is still wonderfully molten.
Makes approximately 18 buns
205g gluten-free self-raising flour (1¼ cups, see recipe below)
250g gluten-free cornflour (2 cups)
2½ tsp salt, plus ½ tsp extra for sprinkling
1 tsp cracked black pepper
1 tbsp xanthan gum
75g butter, melted, or 75ml light oil (eg sunflower, rice bran, canola, light olive oil)
1 large egg, at room temperature
1½ cups full-cream milk, or non-dairy alternative (375ml)
1 tbsp psyllium husk powder
125ml water (½ cup)
1½ tsp instant dried yeast
50g parmesan, coarsely grated (½ cup)
250g mozzarella, coarsely grated (2 cups): Feel free to use whichever cheeses you prefer, but stick to ones that are easily melted, with a sharp flavour profile.
6 large garlic cloves, crushed
⅓ bunch flat-leaf parsley leaves, finely chopped, plus extra to serve
Preheat the oven to 190C/170C fan with the oven rack positioned in the middle of the oven. Grease a 22.5 x 33 x 6cm baking dish and line with baking paper.
Sift the flour, cornflour, salt, pepper and xanthan gum into the bowl of a stand mixer and whisk to combine.
Whisk the butter, egg and milk together in a small bowl, then pour this mixture on to the sifted dry ingredients.
Using the dough hook attachment, mix on low for one minute to combine, then increase the speed to medium and mix for a further eight minutes to work the xanthan gum into the batter. Stir the psyllium and water together to form a slurry, add to the bowl with the yeast, parmesan, half the mozzarella, garlic and parsley and mix for one minute more. (Alternatively, mix the ingredients together in a mixing bowl with a hand mixer.) Leave the dough to sit for five minutes.
Using a ¹⁄3 cup spring-loaded ice-cream scoop, transfer slightly heaped scoops of dough into the prepared dish, keeping them 1cm apart, starting in one corner and working your way across the dish, repeating until it is full and there is no more batter to scoop. Leave in a warm, draught-free spot to prove for 30 minutes, until risen by a third.
Once proved, scatter the extra salt and remaining mozzarella over the top. (The salt sprinkled on with the cheese really helps bring out the flavours, so don’t be scared to add it.) Bake for 40 to 45 minutes until the buns are risen and golden, the cheese is well melted and the tops spring back when you press down gently on them with two fingers.
Remove from the oven and leave to cool slightly for two minutes. Serve hot with a little extra chopped parsley scattered over the top.
Storage: These buns will keep in the fridge in an airtight container for up to three days. Reheat before eating.
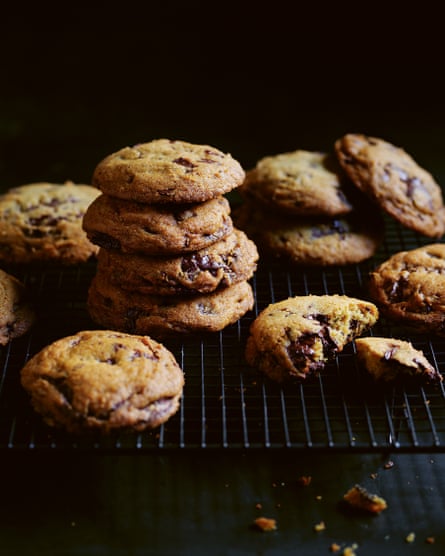
Chocolate chunk cookies
I promised my kids I’d develop a chocolate chip cookie for my cookbook, although I’ve made the chips more like chunks.
Makes 13 to 14 cookies
205g gluten-free plain flour (1¼ cups, see recipe below)
½ tsp xanthan gum
1 tsp bicarbonate of soda
150g butter, cut into small cubes and at room temperature
60g brown sugar (⅓ cup)
65g raw caster sugar (⅓ cup)
1 tsp vanilla extract
1 large egg
250g dark cooking chocolate, broken into small chunks (or substitute with with any chocolate of your choice)
Line three large baking trays with baking paper.
Sift the flour, xanthan gum and bicarbonate of soda into a bowl and whisk together thoroughly.
Add the butter and sugars to the bowl of a stand mixer with the paddle attachment fitted, and cream together on low–medium speed for one minute. (Alternatively, mix the ingredients together in a mixing bowl with a hand mixer.)
Gradually add the vanilla extract and egg while the motor is running, increasing the speed to medium–high, for two minutes, scraping down the sides of the bowl halfway through. Gradually add the sifted dry ingredients until everything is just combined. Fold in the chocolate using a spatula, then transfer the bowl to the refrigerator and leave for 20 minutes for the dough to chill and firm.
Divide the chilled dough into 50g portions and shape each into a ball. Arrange the dough balls on the lined trays spread 10cm apart, then transfer to the fridge and leave to chill for 30 minutes. (This will help rest the dough so that when it bakes, it keeps its shape and doesn’t spread too far.)
Preheat the oven to 180C/160C fan with the oven racks positioned in the middle of the oven. Gently press each dough ball to flatten slightly, then bake the cookies for 12 to 14 minutes, rotating the trays after eight minutes, until lightly golden.
Remove from the oven and leave to cool for five minutes before transferring to a wire rack to cool completely. These cookies are also delicious eaten warm while the chocolate is gooey.
Tip: To make these into double chocolate cookies, add ¼ cup cocoa powder to the dry ingredients and decrease the flour quantity by 40g (¼ cup).
Storage: These cookies will stay fresh in an airtight container for seven days. Once rolled into balls, the dough can be frozen for up to one month. To bake, simply defrost slightly, flatten and cook as above.
Gluten-free plain flour
This plain flour blend can become your go-to for almost all gluten-free baking recipes. The ingredients are easily available either online or in the gluten-free section of your supermarket or health food store, though just be sure the cornflour you are purchasing is derived from corn and not wheat. Because of the high ratio of brown rice flour to starch, I find this flour blend to be consistent in my baking, especially compared with a lot of the supermarket gluten-free blends, which are often high in starch and low in rice flour.
I like to use brown rice flour here as it’s more wholesome and results in moister baked products than white rice flour. In my recipes, when I refer to plain flour it is to this blend with the xanthan gum included. The xanthan gum helps with your bake’s texture and creates lightness and elasticity, as well as preventing the pastry from crumbling. If you need a blend that’s gum-free for whatever reason, simply omit it.
Makes approximately 1kg
850g brown rice flour
100g potato starch
50g gluten-free cornflour
7g xanthan gum
Sift all the ingredients together into a large mixing bowl, then whisk together well to ensure they are well mixed. Store in an airtight container in a cool dry place for up to three months.
Gluten-free self-raising flour
This is the same as my plain flour blend above, plus gluten-free baking powder. Simply omit the xanthan gum for a gum-free recipe and be sure to search out gluten-free baking powder that is specifically labelled as such, as many baking powders are derived from wheat.
Makes approximately 1kg
850g brown rice flour
100g potato starch
50g gluten-free cornflour
55g gluten-free baking powder
7g xanthan gum
Sift all the ingredients together into a large mixing bowl, then whisk together well to ensure they are well mixed. Store in an airtight container in a cool dry place for up to three months.
-
This is an edited extract from Gluten-Free Baking Made Simple by Cherie Lyden, photography by Ben Dearnley. Available now through Murdoch Books ($49.99).